Fortunately, there are ways to avoid being consumed by the Web and to create a more pleasant, catalogue-like browsing experience, but they are by no means obvious to the average person. This blog will attempt to introduce the reader to some intermediate browsing techniques. It assumes that the reader is already familiar with basic browser usage, and will then point out how, by installing a few add-ons, making a few configuration changes, and learning a few keystrokes, one's browsing experience can become both more controlled and more pleasant. This requires work on the reader's part; it's not a give-me like most consumers desire, but tough shit, it's the world we currently live in. This guide is divided into three sections, called "Power Levels", of increasing difficulty, with the first section requiring little to no work and having relatively little negative effect on one's browsing experience and a large positive effect, while the later sections require more work for often smaller gains. Readers who are unsure of their skills should take a week or two in-between sections in order to familiarize themselves with any changes that they have made.
The Web browser of choice for this blog will be Firefox, because Firefox is Free Software. Other common browsers, such as, but not limited to, Google Chrome, Safari, Microsoft Explorer, and Microsoft Edge are proprietary software and, therefore, considered harmful. Make no mistake, Firefox has its flaws and its parent company, Mozilla Corporation, has made some questionable decisions, but it's currently the best of the Free and featureful browsers to use.
It's worth noting that there are other ad-blockers. "AdBlock Plus" (ABP) is noteworthy for having been the de facto standard for a while before falling out of favor by many due to an "acceptable ads" campaign, in which certain, "unobtrusive" advertisements are not blocked by default and a portion of the revenue generated by the advertisements in sent to the ABP developers. The AdBlock Plus add-on also tends to take up far more memory than uBlock Origin, which gave me issues on my low-memory machines, thus I prefer uBlock Origin for that reason alone. There's also "uBlock", which was originally developed by the author of uBlock Origin, but apparently there were some issues and now the original author is working on uBlock Origin and that's what I've decided to use. Feel free to check out the other one if you are so inclined.
The next thing to do is to install the "HTTPS Everywhere" add-on developed by the Electronic Frontier Foundation (EFF). A brief explanation is in order: HyperText Transfer Protocol (HTTP) is the protocol used for the Web, and HTTPS is, roughly speaking, the Secure version of that protocol. HTTPS is useful because it's the reason crackers cannot easily break into your bank account or use your credit card when you are browsing the web. Many sites offer both secured and unsecured versions of their webpages but configure their websites such that users must explicitly request the secure version of the website by prefixing the address with https://, which is a giant pain in the ass. HTTPS Everywhere fixes this problem by automatically rewriting (a.k.a. "changing") any HTTP addresses to their secure, HTTPS variants, no user intervention required. This is done through a database of sites that comes with the program; the database knows how to rewrite addresses for different sites. Although a few, very obscure sites may not have their addresses rewritten, the vast majority will.
Lastly, it is worth learning one mouse click technique and a few simple key-commands. Most mice have a scroll wheel in the middle, and that scroll wheel can be pressed in order to generate a "middle-mouse button click", or "middle-click" for short. Middle-clicking a link will open said link in a new tab. This is far faster than going through the tedious process of right-clicking the link and then selecting "Open in New Tab" from the drop-down menu. It's a serious time-saver. Use it. The middle-mouse click can also be used to close a tab by clicking on the tab itself. Ever accidentally close a tab and then realized that it shouldn't have been closed? Type Ctrl-Shift-T to bring it back! Continue typing the command in order to bring back tabs in the order in which they were closed. Finally, Ctrl-F can be used to Find text within a webpage. Just in case one wasn't aware.
That's it for this first section. One's browsing experience should now be ad-free, far more secure, and hopefully a little bit smoother with those middle-clicks. There probably won't be any disruption in one's browsing experience, but take some time to get used to it before proceeding onto the next section.
Begin by making some configuration changes to Firefox that will cause each session to be independent of the others. In other words, each time Firefox is closed and opened it will be as if no websites had been visited during the previous time Firefox was open, even if they were, as if Firefox had just been installed, except, of course, the add-ons, bookmarks, and other user-defined settings will remain. I could try and describe the bloody icons that lead to the Preferences menu, but it'll be easier if I tell you to simply type F10 to open the old-style text-based menu and then navigate to Edit -> Preferences. From there, click on the tab labeled Privacy, then find the section labelled History and change the corresponding drop-down to Never remember history. Likewise, next find the section labelled Location Bar and uncheck all of the boxes. Lastly, click on the tab labelled Advanced, then another tab labelled Network and finally the section labelled Cached Web Content and check the Override automatic cache management checkbox and then set the specified value to 0 MB. That should make each browsing session far more independent and thus make tracking more difficult, but it will be noticeable as many sites that require a login will no longer "remember" one's username and one will thus have to type it in again.
Next comes the biggest change: installing the "NoScript" add-on. This add-on is what allows one to selectively enable and disable JavaScript. Unlike plain HTML, JavaScript is actually code that is sent by the web server and run on the user's computer. This code is what allows the browser to track the user's mouse movements, keystrokes, and gather various information about the user's system. The fact that browsers run arbitrary JavaScript code on the user's computer is a large part of what turns the Web from a catalogue into a two-way mirror (confusingly enough, JavaScript has no relationship to the Java programming language). What NoScript does is to give one some control over what JavaScript is run on their computer. The default is to block all JavaScript, which will cause many sites to break, but scripts can be allowed on a per-site basis by clicking the NoScript icon and then selecting Temporarily allow from <address> from the drop-down menu where <address> is the name of the site that the JavaScript is loaded from, and when the drop-down menu is closed the site will automatically reload with the selected scripts enabled. Note that most sites load JavaScript from multiple sources, thus the Temporarily allow all this page option can come in handy when one wants to load all scripts on the site, but note, however, that some scripts will then drag in other scripts, and thus for certain sites one will have to "allow all" for the site multiple times. Note that any allowances made will apply to all tabs that one has opened, not just the current tab. When one no longer wishes to allow scripts, clicking the icon again and selecting the Revoke temporary permissions will disable all scripts and refresh the sites whose scripts were revoked. It's actually quite simple once one gets the hang of it.
After using NoScript for a while one will inevitably notice that certain addresses come up again and again. Most notorious in my opinion is google-analytics.com. Since I have absolutely no desire to be analyzed by The Googlaug ever, I banished the script permanently by clicking the NoScript icon, then selecting Untrusted -> Mark google-analytics.com as untrusted, thus removing it from the drop-down menu. Good riddance. The drop-down menu can be customized by selecting Options and then the Appearance tab and toggling the various boxes. It can be useful to uncheck the Allow [...] and Allow all this page boxes if one does not wish to even accidentally give some scripts permanent permission.
Now, NoScript actually does a little more than just block JavaScript, it also protects against a few types of Web-based attacks by blocking Cross-Site Scripting (XSS) and implementing Application Boundary Enforcer (ABE). Although these are generally considered a Good Thing (TM), they occasionally cause problems with crappy Web portals, for example, at one's local library where one is required to agree to a Terms of Service (ToS), and need to be disabled. ABE can usually be worked around by choosing the "Unsafe Reload" option after it has been triggered, but both can be disabled by opening the options window, selecting the Advanced tab and then selecting either the XSS or ABE tab and turning the offending feature off. With that one should now have some basic control over the JavaScript run on one's own computer.
A few more useful key-commands are now in order. First, Ctrl-L and Ctrl-J move the cursor to the Location and Search Bar, respectively. For tab-management, Ctrl-T opens a new tab, Ctrl-W closes the current tab, and Ctrl-Q quits the browser program; because the Q key is right next to the W key, it's a good idea to keep the "Warn me when I attempt to close multiple tabs" checkbox enabled. Lastly, use Ctrl-PgUp (Page Up) and Ctrl-PgDn (Page Down) in order to move to the previous and subsequent tab, respectively.
Thus ends the second section. Each browser session should now be more independent and two-way mirror functionality will be disabled by default. These are both rather large changes to make, but they offer significant privacy and security advantages, so the added difficulty is often worthwhile. Make sure to become comfortable with these changes before moving onto the next section.
Filter lists are nice for most uses, but sometimes one needs custom filters on a site; this can be done by clicking "I am an advanced user" in the dashboard's "Settings" tab and thus enabling dynamic filtering; make sure to read the corresponding documentation under required reading before trying to apply any dynamic filters; they are not covered here because the existing documentation is better than what I would write. Note that after enabling dynamic filtering it's interesting enough to simply click on the uBlock Origin icon after loading a site and seeing which sites one's browser has connected to. In a similar vein to the zapper icon (in the menu that appears after clicking the uBlock Origin icon), the eye-dropper, or element picker, helps create custom filter rules rather than simply removing an element until the page is reloaded, but be careful about the filters it creates unless one wants to filter more than intended. Adding custom filters in more of an art than a science, but it provides incredible control over which services get to track one's virtual movement across the Web.
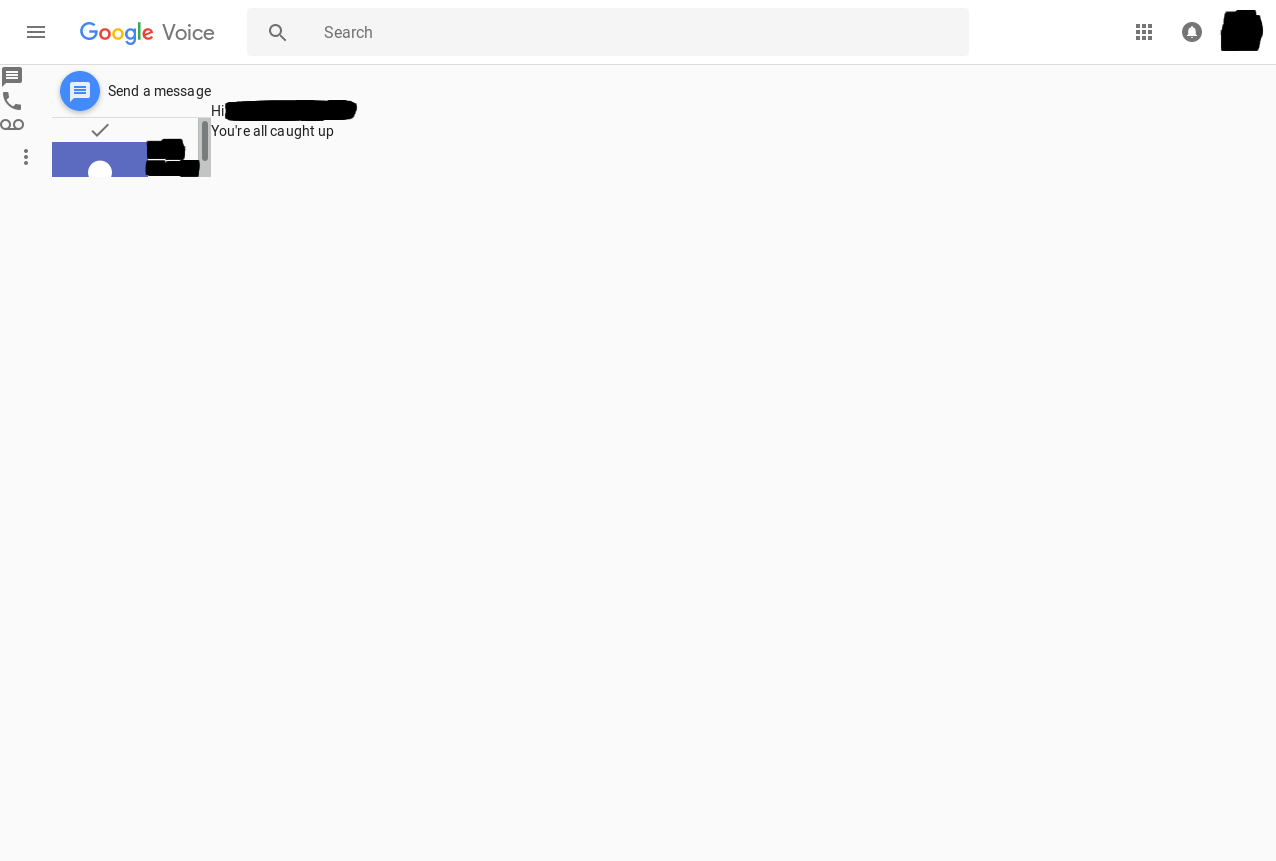
When customizing Firefox, one might be tempted to naively believe that, after clicking on the gear icon and perusing all sections and tabs and setting things up as one desires that they're finished with all possible non-add-on-based customizations. However, Firefox, in fact, actually has a, well, it's not exactly hidden, but unadvertised, perhaps, customization menu that can be reached by typing about:config into the address bar (then hitting Enter, obviously). This page consists of a list of preferences with a type and value and whose values can be customized by the user. A full discussion of all preferences in this menu would likely require an entire encyclopedia, so only a few noteworthy preferences are mentioned here. First off is the UserAgent, which is a string containing various client metadata such as operating system, browser vendor, browser version, &c, and which is sent to the web server when the connection is first established so that the web server can serve up client-specific hacks, nevermind that the whole damn point of the web was to be platform-independent. One can view their UserAgent by navigating to about: in the address bar, and one can customize it in the about:config menu by right-clicking then selecting New -> String and then giving the preference name general.useragent.override and then providing whatever value one wants; check about:config to confirm. Note that poorly-designed sites will break if they can't supply custom browser-specific hacks, for example, this is what Googlaug Voice looks like with the classy UserAgent of "Fuck JavaScript":
Note that using a custom UserAgent is probably less anonymous than one might think.A few other noteworthy preferences are javascript.options.asmjs which allows JavaScript to run native code on one's computer and will probably cause some security nightmare within the next decade or two (set it to false now). One may also wish to set webgl.disabled to true, although NoScript already forbids WebGL by default. Due to recent events one will probably want to set experiments.enabled to false. Note that while one might be tempted to set javascript.enabled to false, JavaScript is actually used internally by the browser and add-ons, and thus disabling it here actually causes add-ons to not function properly, relying on NoScript is recommended instead.
This section has been rather open-ended, because customizations at this point have become, well, highly-customized. Nonetheless, one should now have an idea of how to go about blocking content on websites they visit and performing deep configuration of Firefox.